Wednesday, January 4, 2017

WWC100 - CELEBRATION (ANYTHING GOES) CHALLENGE

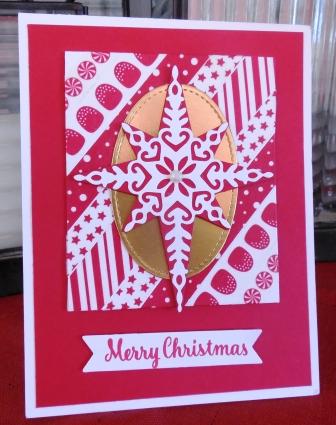
This week's Watercooler Wednesday challenge is super special, and not just because it's the first challenge of the New Year.  It's special because it marks the "100th" Challenge on this site!  WOW that's so awesome! so our theme this week is an Anything Goes - as long as it's about "Celebrating".
Here's My Card:
I've been dying to share a stamp set I received for free at the November 2016 Stampin' Up! OnStage event in Vancouver, called "Birthday Blast".  This great set is part of a bundle featured in the new Occasions 2017 catalogue which goes live today.  Yippee!!!! 
 

Supply List:

Stamp Set: Birthday Blast
Card Stock: Emerald Envy, Very Vanilla, Sweet Sugarplum
DSP:  Playful Palette DSP and Scraps of Silver Glimmer Paper for stars
Ink: Momento Tuxedo Black Ink, Peek A Boo Peach, Emerald Envy, Black Marker
Accessories:  Trimmer, Detail Cutting Scissors, Dimensionals, Tear N' Tape, Basic Rhinestones, Star Punch from Itty Bitty Accents punch set, Acrylic blocks. 
Add caption Birthday Blast Bundle
Assembly:
I haven't made one of these pop up style cards since I began Stampin' Up! in 2006, so I looked up a video tutorial by Dawn Griffith that explains all the ins and outs of assembling this card.  This card goes together quickly and you could easily knock off several of these while watching television if you do your pre-cutting and stamping first.  Note at the time of writing this post I did not have the accompanying dies so fussy cut out my design.  Here are the measurements for the card stock and DSP you'll need to make my version.

Base:
  • Cut a 4 1/4" x 11" strip of Emerald Envy card stock
  • Score it at 1", 2 3/4", 3 3/4", 5 1/2" 7 1/4", 8 1/4" and 10"
  • Fold on center crease line
  • Stretch out the card stock and put the long side in the trimmer, lining up to cut along the 5 1/2" fold line.  Move the cutting blade down to 1/2" on the trimmer arm and score to 3 3/4".  
  • Cut 2 pieces DSP for top of box 1 1/2" x 4" and 2 at 3/4" x 4" 
  •  cut a 3 1/4" x 1 1/4" piece of Emerald Envy and a 3 x 1" piece of Sweet Sugarplum for the "Celebrate You" sentiment.

 Slider Piece:
  • Cut a 3" X 5 1/2" piece of Emerald Envy
  • Cut a piece of DSP 2 3/4" x 5 1/4"
  • Cut a piece of Very Vanilla card stock for back of panel 2 3/4" x 5 1/4"
  • Cut a piece of Very Vanilla card stock for front of panel 2 1/2" x 5"
 Stamping:
I stamped the "tiara" portion of the stamp twice on Emerald Envy and again on Sweet Sugarplum card stocks and fussy cut out all three images.  I cut out the top of the image from the Sweet Sugarplum stamped piece and mounted it with dimensionals to the top of the Emerald Envy image, and then glued this to the Very Vanilla front panel. 


I flipped the second Emerald Envy tiara upside down, butted the end of it up against the top portion and glued it down with Tom Bow glue. Note: I didn't layer with Sweet Sugarplum because the additional layers would prohibit the card from sliding through the slot. 
To finish this card I added a lot of Basic Rhinestone bling and some Silver Glimmer Paper stars.  The small stars and celebration confetti are also images from this stamp set and I stamped them in the background in Peek A Boo Peach and Emerald Envy Inks.   

 The finished card is very shiny and glitzy.  Remember with all this detail you have to be careful when closing the card.  If the embellishments get in the way it won't collapse easily.  Here' s what mine looks like when it's closed and it will fit in a standard envelope.  

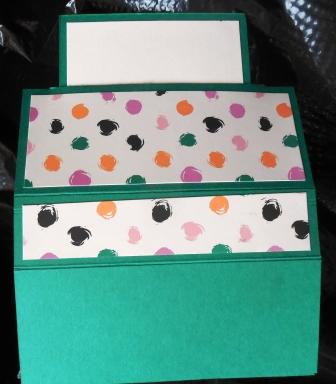
I didn't stamp any sentiments on the back of the card as I may save this for an achievement rather than a birthday or special occasion event. 

So that's it for my celebration card today. 

 I hope if you're not already stamping or entering challenges that this will be the year you join in.  We'd love to have you submit your cards or projects to our weekly challenges. Who knows, you could "Rock the Watercooler" to display on your site. Here's how the challenge schedule is laid out every month:
Week 1 - Sketch
Week 2 - Color
Week 3 - Simply Stamping
Week 4 - Masculine
Week 5 - They don't happen that often, but when they do it will be a surprise.

I hope you'll check out the rest of the Watercooler Wednesday Design Team Artist's contributions to this very special occasion.  Our special guest designer Bronwyn Eastley is back and she will be picking a winner from the comments she receives and send them a special tutorial.  To go back to the Watercooler Wednesday blog just click here.  

HAPPY STAMPING!
PENNY TOKENS STAMPIN' SPOT  
OCCASIONS JANUARY 4TH TO MAY 31ST, 2017:
Hi Everyone!  Welcome to a new year or stamping!   It's official we have a new Occasions Catalogue going live today!   


SALE-A-BRATION Jan 4th to March 31st, 2017:

How Can You Earn FREE products during SALE-A-BRATION? 

It's really simple here are four ways that you can qualify for a free product when you order from the Occasions or Annual Catalogue during the sale period from January 4th to March 31st 2017:


SHOP:  For every $60 CAD you spend (before tax and shipping), you get a FREE Sale-A-Bration product. This is the perfect time to purchase items you’ve had your eye on while earning more items for free.

HOST  Need another excuse to get together with friends? No problem, all you need to do is host a qualifying party (live or virtual) with at least $330 CAD in sales during Sale-A-Bration and you’ll earn $35 CAD more in Stampin’ Rewards! You can even apply your Stampin’ Rewards toward a Starter Kit and become a demonstrator yourself!


JOIN  It’s the best time of year to join Stampin’ Up! and my growing team.

During Sale-A-Bration, you can become a demonstrator for just $135 CAD and choose TWO additional stamp sets for your Starter Kit—any stamp set, any price! Plus, the kit ships for FREE!  NOTE:  This offer excludes Sale-A-Bration sets and bundles.

PAPER PUMPKIN SUBSCRIPTIONS:
 

What could possibly make Sale-A-Bration even better? Getting Paper Pumpkin involved, of course! It just might be the easiest way for you to earn FREE SALE-A-BRATION items.  Here's how:

Purchase a 3-Month Prepaid Subscription (137859) $74 CAD.  Get a discount on 3-month prepaid subscriptions and instantly qualify for a FREE Sale-A-Bration item!

Purchase a 12-Month Prepaid Subscription (137861) $295 CAD.  Take it to the next level with a 12-month prepaid subscription. Save over $2/month with the everyday awesome price, earn Stampin’ Rewards, and instantly qualify for 4 FREE Sale-A-Bration items!

This offer ends  March 31, 2016 at 11:50 PM (MT).


Happy Occasions and Sale-a-Bration Stamping!
Penny Tokens Stampin' Spot  

Saturday, December 31, 2016

Favourites from 2016

Happy New Year Everyone! 
And, what a great year 2016 has been for me!  I've had a lot of stamping fun this year, reached some personal goals I set for my stamping hobby/business and had some great stamping achievements:
  • Was a guest attendee at a Stampin' Up Event in January in Duarte California and my card won in it's category
  • Reorganized my stamp room early in March and it works!  
  • I was invited to join the Watercooler Wednesday Challenge Blog as a member of the Design Team in April
  • Joined the Wacky Watercooler Blog Hop as a regular contributor in April
  • In May I was picked as a Display Artist for the November On Stage Vancouver and got to make projects with the Urban Collection stamp sets and dies - what fun and an honour!
  • Reached my goal of Silver Elite in December
  • Grew my Stampin' Up! Team by 2 new members in December
  • Participated in a Stampin' Up Virtual Survey during December
  • Finished and mailed out all my Christmas cards on time this year! 
  •  
So  the following is really a trip down memory lane for me and includes some of my favourite posts. I hope you're inspired and will leave some comments. 

April 2016:

Kath's WWC63 Colour Challenge Click Here:
May 2016:

Wacky Water Cooler Mashup Blog Hop Click Here:


June 2016:

Dreaming of November ......Click Here:

July 2016:

WWC78 Jean's Theme Challenge - Anything With a "B"Click Here:


August 2016:  
WW83 Penny's Z-Fold Birthday Wishes  Click Here:

September 2016:
WWC85 Jean's Colour Challenge  Click Here
October 2016:
WWC91 Marsha's Masculine Challenge   Click Here

November 2016: 
November 2016 Wacky Watercooler Blog Hop Click Here:
Check out all three projects in this blog hop.  From gift card holders to box card they are all fun!
December 2016:  

WWC99-Marsha's Clean and Simple (CAS) 

Make It With Hearts Challenge

Click Here:
Well that's it for this year.  I hope you've enjoyed this little tour and will come back and see me in 2017.  I love it when people visit my site and it absolutely makes my day when you let me know if you like the projects I'm working on.  I'd also like to here if there are particular cards you'd like me to make.    Happy New Year Everyone and Happy Stamping! 

Happy Stamping!
Penny Tokens Stampin' Spot

Thursday, December 29, 2016

My First 12 x 12 Sampler

I like firsts!  It's so exciting to do something for the first time.  I'm always so afraid to take the first step, but once I actually get geared up and start the fear suddenly disappears and the endorphins kick in and the thrill of discovery and creativity takes over.  What a thrill!

My project today is a Christmas sampler and it's a "first".  Although I've often admired and drooled over the samplers that I see other card makers display, I've never made one myself.  So when a friend asked me to create something special for his partner for Christmas morning (actually the "largest card" I could make), it was a no-brainer.  I suggested a Christmas Sampler with a card and he agreed.  And, I'm so happy he did!  What an enabler!

Supplies:
Stamp Sets:  Merry Mice, Candy Cane Lane, Christmas Cactus, miscellaneous snowflake and let it snow stamps
Card Stock: Whisper White, Early Espresso, Crumb Cake, Real Red, Candy Cane Lane DSP, Chip Board, Watercolour Paper, Dazzling Diamonds and Red Glimmer Papers
Ink: Cherry Cobbler, Crumb Cake, Early Espresso, Real Red, Pacific Blue, Old Olive, Flirty Flamingo, Tip Top Taupe, Delightful Dijon, Pear Pizazz,
Accessories: Paper Trimmer, Detail Scissors for fussy cutting, Dimensionals, Tom Bow Glue, Tear N' Tape, Aqua Painter, Circle Framelits, Banner Framelits


Dimensions:
Since I only had a few hours to pull this together and didn't have a lot of supplies on hand I basically began hauling out my Christmas stamps and designer paper to see what I would put together. Ideas started to flow and  creativity started to kick in once i began fussy cutting images, water colouring and gluing.  Here's how it took shape:
1.  Base layer:  I started working with a 12 x 12 piece of White Chip Board from the Candy Cane Lane DSP package, turning the side without writing to the top. 
2.  Second layer:  11 1/2" x 11 1/2" piece of diagonally striped DSP.
3.  Third Layer:  11" x 11" piece of Crumb Cake and white DSP.
4.  Small Squares:  3" x 3" Early Espresso layered with 2 3/4" x 2 3/4" card stock or DSP.
5.  Two Large Rectangles:  3" x 6 1/2" layered with 2 3/4 " x 6 1/4" Crumb Cake and 2 1/2" x 6" Whisper White layers 


The Other Side:
Unfortunately I didn't have time to take a picture of the reverse side of this sampler, but  I did cover the chipboard with another designer series paper from the Candy Cane Lane collection.  It was the one with the Candy Cane hearts.  

I created an actual Christmas card that could be signed and I attached it to the center back of the sampler with Tear N' Tape.
The card base is an 8 1/2" x 5 1/2" piece of Real Red card stock, layered with a 5 1/4" x 4" piece of Whisper White and then a piece of Watercolour paper cut to 5" x 3 3/4".  The Christmas Cactus is an old Whipper Snapper stamp I've had for years, and was appropriate for this gift.  Of course the cute little mousie is from Merry Mice.  

Well that's it for today's project.  I hope you've enjoyed this share and it inspires you to step out of your comfort zone and create something you wouldn't normally try. The recipient of this card was thrilled and plans to frame this little "piece of art". 

I'd love to hear your thoughts on this sampler and any questions you might have about it's assembly.  
Happy Stamping!
Penny Tokens Stampin' Spot

Tuesday, December 27, 2016

Seven Cards I want to share

What is it about receiving cards?  

Cards are such an important way to share friendship at any time and any occasion during the year.  But especially at Christmas. 

I can't even begin to express how much it means to my husband and I to receive them. It's so exciting to reach into the mail box and discover some special envelopes.  These cards bring sunshine and smiles to our day, and just knowing someone has taken the time out of their busy lives to acknowledge us and share some of their seasonal updates makes us happy! 

I  must admit that at this time of year there are some cards that stand out from the rest and I pick them up over and over.  They are the hand crafted cards and today I want to share seven such cards.  I was amazed and thrilled with the love that went into each and every one of these cards.

Card One by Betty Lee: 

I really loved this card stamped with the Reindeer from the Stampin' Up Cookie Cutter Christmas stamp set. Betty Lee has punched out the cute hat in from Red and Dazzling diamonds glimmer paper and the Stampin' Up! Jolly Hat Builder Punch.  What a great card Betty Lee!  Loving it!

Card Two By Debby Evoy:
Isn't this a gorgeous combination of the Stampin' Up! Starlight Thinlet Dies and Candy Cane Lane Designer Washi Tape. I totally loved the design! Great way to use the Washi tape Deb!  This card was made by mygood friend and fellow demonstrator Debby Evoy from Abbotsford BC. 

Card Three By Elise:

My sweet and talented sister-in-law Elise from Vancouver, BC made this super cute card with fun foam stickers.  We loved it Elise.  Beautiful inside and out, just like you! 

Card Four by Cheryl LeFore:

Every year I receive an amazingly beautiful card from the very talented Cheryl LeFore, a Stampin' Up Demo from Laquinta California.  Cheryl was Stampin' Ups! Artisan of the year in 2012, so it's such a thrill to get one of her creations.  I love all the elements Cheryl's used on this card and the background snowflake stamping.  Cheryl, thanks for thinking of me!

Card Five by Heather:
My sister Heather's been participating in the Merry Monday Christmas Card challenges and the Watercooler Wednesday weekly challenges during 2016 and has made some simply amazing cards. This very cute card features some happy little "snowbirds" and snowflakes inside and out.  It brought a smile to my face Heather.  Super cute!  Thanks so much!

 Card Six by Ethel DeTemple:

I'm totally loving this Christmas card made with the Jar of Love Stamp Set and Dies set and Cookie Cutter Christmas Designer Series Paper.  Ethel you did a fabulous job with this shaker.  It's so perfect!  Thanks so much for this fun card!  My good friend Ethel is also a Stampin' Up! demonstrator in the Surrey Fleetwood area of BC.  
Card Seven by Phyllis:


Our last card is from another good friend Phyllis, who lives in the Okanagan.  Phyllis created this stunning die cut card featuring products from Stampin' Up! and Karen Burnston die cuts.  This card took my breath away Phyllis when I pulled it from the envelope.  Wow!  Simply beautiful! Thanks so much!

Well, there you have it for today.  Beautiful and much appreciated cards from friends that I love!  Thanks everyone for making my Christmas memories in 2016! 

Happy Stamping!
Penny Token's Stampin' Spot 
Merry Christmas Everyone!

Saturday, December 24, 2016

Merry Christmas Wishes

Christmas Eve that magical night of nights has arrived.  Hopefully all your shopping and preparations for Christmas day are behind you and now you can sit back and relax with your family and friends.  

I've been busy making my White Chocolate Gumdrop Fudge and Butter Tarts today and getting ready for a mexican lasagna feast later tonight.  It's always so wonderful to get together and share the season with good friends!  

Merry Christmas everyone and thanks for supporting and following me during this past year.  I hope you'll continue to return to this site in 2017.  

All the Best to You and Yours!!    

Wednesday, December 21, 2016

WWC99-Marsha's Clean and Simple (CAS) Make It With Hearts Challenge

Wednesday has rolled around again and it's time for the last WWC99 Watercooler Wednesday challenge  of the year since this challenge will run from December 21st through to January 2nd, 2017.  This Clean and Simple (CAS) challenge is being hosted by Marsha and it's all about "hearts". 

Just so you know the Watercooler Design Team Artists decided to lower our expectations for our CAS challenges so all you need to do is enter an uncluttered card with lots of open space and minimal layers and embellishments and you can play along.  We hope you will join in the challenge! 
 
Here's My CAS Card:
Supplies:
Stamp Sets:  Merry Mice, Bear Hugs, and Love Sparkles*
Ink:  Cherry Cobbler, Crumb Cake, Early Espresso, Delightful Dijon, Basic Black Archival Ink, Flirty Flamingo and Smokey Slate
Card Stock:  Cherry Cobbler, Cansun 90lb Watercolor Paper
Accessories:  Big Shot, Trimmer, Bear Hugs Thinlets, Aqua Painter, Baby wipes, Scissors, Dimensionals, Tom Bow glue, Tear and Tape.
The Merry Mice stamp set is from the Holiday Occasions catalogue and will retire January 2nd, 2017.  It's currently on sale in the Year End Extravaganza.  Product #42154
The cluster of hearts behind the little mouse is supposed to be a balloon bouquet. The "love you" heart is from the Bear Hugs stamp set and is cut out with the Bear Hugs Thinlet heart die. 

I bet you're wondering where that fancy double-outlined heart came from aren't you? Well, I got it for free when I attended Stampin' Up!s OnStage Presentation in Vancouver.  It's from a delightful new stamp set called "Love Sparkles" and will be available in the new Occasions catalogue, just in time for Valentine's Day.
Bear Hugs Stamp Set #39546 in the Annual Catalogue
Assembly:
1.  The Cherry Cobbler card base was cut to 8 1/2" x 5 1/2" and scored at 4 1/4". 

2.  I cut three pieces of Watercolor Paper, for the layers.  The first layer measured 4" x 5 1/4" and the second layer measured 3 3/4" x 5". The final layer which measured 4" x 5 1/4" was for the inside of the card. 

3.  I stamped the mouse image from Merry Mice with Black Archival ink on the second layer of watercooler paper. Note:  After inking up the image and before stamping, I wiped the ink off the stocking hat and piece of scarf that poked out below the mouse's arm because I didn't want them to show up on the finished card.  I just used a baby wipe to take the ink off. 

4.  I stamped a second image of the mouse on a scrap of watercolor paper and again wiped away the hat and scarf portions of the image before stamping.  I fussy cut away the bottom portion of the mouse, and the hat leaving his face, upper body and arms in tact.  And, I cut away the portion of the book top between the mouse's hands so I could insert the little red heart. This portion of the mouse was coloured the same as the base and it was mounted with dimensionals after the stamping on the base layer was finished.
 
I fussy cut out a second image of the to portion of the mouse so I could layer it on top of the original layer.  This is just a sample so it isn't cut very neatly.... it's just to give you the concept.
5.  I painted the mouse image with Cherry Cobbler, Crumb Cake, Flirty Flamingo, Early Espresso and Delightful Dijon inks, using a fine tipped aqua painter. I repeated this colouring on the portion of the mouse that would be layered later on.

6.  Because I'd eliminated the stocking hat from the second mouse image I needed to replace it with something else.  To do this, I stamped a reindeer head from the Cookie Cutter Christmas set and cut off the portion between the horns to make a little cap.  I coloured this with Delightful Dijon and then added it with a piece of dimensional to the top of the mouse's head to form a cap.  
I just wanted the portion of the deer head that is coloured in yellow.  I drew a line along the bottom of that image with a Basic Black marker and cut it out.  This became the cap on the mouse, all the rest of the

7.  I stamped the mouse image on a Post-It-Note and fussy cut this out for a mask.  I applied the mask over the mouse and stamped the heart images.  I also stamped masks for the hearts so I could layer them.  They were all stamped in Cherry Cobbler Ink.
Masks stamped on Post-It-Notes.

8.  Once the inks had dried I attached the upper portion of the mouse with dimensionals. I punched out a little red heart using the punch from the retired Itty Bitty Punch Accents set and attached it between the mouse's hands with a piece of dimensional.  I used an aqua painter and Smokey Slate ink to outline the mouse image and give some depth to the background.  Some of the Cherry Cobbler ink ran a bit so I just lightened and blended it into the background.


Note: After I made the above card, I thought I should have used flowers instead of the heart, so I had to try out that look. Voila here's what that version looked like.
The floral bouquet in this sample is from the Bear Hugs stamp set. 

9.  The layers were glued together with Tom Bow Glue and then attached to the card base with Tear and Tape.  The inside of the card was finished with the remaining Watercolor paper layer. 

Well that's it for this year! I hope you've enjoyed this card along with others I've contributed to the Watercooler Wednesday Challenges and that you'll continue to follow and contribute your cards to this site.  I'd love to hear your thoughts on this card and my little tutorial explaining how it was assembled.

I also hope you'll visit the other Watercooler Wednesday Design team sites and leave them some comments too.   It's so inspiring for us.   

Happy Stamping!
Penny Tokens Stampin' Spot

Paper Pumpkin Alternatives April 2024 and Sketch Challenges

The past week was so busy that time literally flew by.  I have a number of projects on the go, including working on my April 2024 Paper Pump...