Thursday, July 25, 2013

Convention Swap Posts Day Two:

It's Day Two of my posting and here's the next round of swap cards I'd like to share with you starting with card # 12:
Card Twelve:  Here's another beautiful card done with the "Wetlands" stamp set.  This one is by Geri Grinstead of Augusta Georgia.  The colouring of the shore birds is exquisite.  I love Geri's choice of card stock too.  The Cajun Craze and Daffodil Delight are blend beautifully for the background on this card.  And how about those banners? She used the square punch to achieve those perfect points. Geri punched out the oval with the Ovals Collection Framelit Dies.   Thanks Geri for swapping with me, I luv this card!
Card Thirteen:  On Wednesday night we met two nice gals, Jan and Diane from Colorado Springs while we were waiting for our table at the Olive Garden.  I happened to run into them again on Saturday in the lunch area at the convention center and luckily for me was able to exchange a card with Jan Lambert. Isn't this a beauty?  I wish you could see this in real life because the Silver Glimmer Paper and the Dazzling details on the flower just bring it to life.  Jan stamped the flowers from the "Flower Shop" stamp set on page 94 of the catalogue in Daffodil onto Whisper White cardstock. She then stamped a single flower in Cherry Cobbler onto Daffodil Delight cardstock and punched it out with the coordinating Pansy Punch.  The final detail about this card that really makes it, is the fan shaped embossing on the Cherry Cobbler cardstock .  Wow is it every lovely!  This effect was achieved with the Delicate Designs Embossing folders for card edges and the Big Shot, and it's just stunning!  Thanks Jan and hope to run into you and Diane again.

Card Fourteen:  This is another "no name" card so I can't give credit to anyone, but I wanted you to see what a lovely card this is.  Someone went to a lot of work fussy cutting the beautiful shells from the "By The Seashore" stamp set on Crumb Cake and Baked Brown Sugar card stocks for a great monochromatic effect. I also like the way the first layer of cardstock was embossed with the Square Lattice Textured Embossing Folder, as it gives the feeling of sand under the shells.  Nicely done! 

Card Fifteen:  This absolutely stunning card was created by Cheryl Lefore from La Quinta, California.  Cheryl, who won the Stampin' Up! Artisan Award in 2011, does absolutely amazing card work.  Everything is so precisely placed and her colour coordination always impresses me. This card is no exception.  She has used Strawberry Slush and Crisp Cantaloupe card stocks for the card base and first layer and then topped that with a layer of Whisper White card stock that was coloured with the Beautifully Baroque Embossing Folder and Strawberry Slush and Crisp Cantaloupe inks. The three perfectly placed pansies on this birthday card are from the 6 piece Flower Shop stamp set and are punched out with the coordinating Pansy Punch.  They look beautiful in Strawberry Slush ink with Crisp Cantaloupe centers that are popped up on dimensionals.  Cheryl added leaf clusters from the Stippled Blossoms stamp set that are stamped in Pistachio Pudding one of the new Incolours.  A Tea Lace Paper Doily was sponged with Crisp Cantaloupe ink and is tucked beneath the flowers and the Whisper White label cut with one of the Labels Collection Framelit dies.  The label has been paper pierced around the edges with the Festive Paper Piercing Pack.  The birthday sentiment from the Remembering Your Birthday stamp set on page 16 of the catalogue is stamped in Crisp Cantaloupe and the You on the small banner is stamped in Strawberry Slush.   Cheryl I`m absolutely thrilled that I was able to meet up with you again at Convention, albeit for a very short visit.  Look forward to seeing you this fall in LaQuinta and taking another of your amazing classes.  See you then!

Card Sixteen:  I was thrilled to get this gorgeous card made by Patti Hargrove in the New Card Swap.  Patti used the Fabulous is What You Are from the Million and One stamp set for the sentiment.  I love how she has added basic rhinestones to the flourishes on the word Fabulous and then mounted the sentiment piece to Island Indigo card stock.  It gives the card a very sophisticated and rich look.  She`s also created an awesome background by repeatedly stamping the large flower image from Betsy`s Blossoms on page 87, in Island Indigo Ink onto Whisper White card stock.  This is a very effective background.  Thanks Patti, I luv your card!

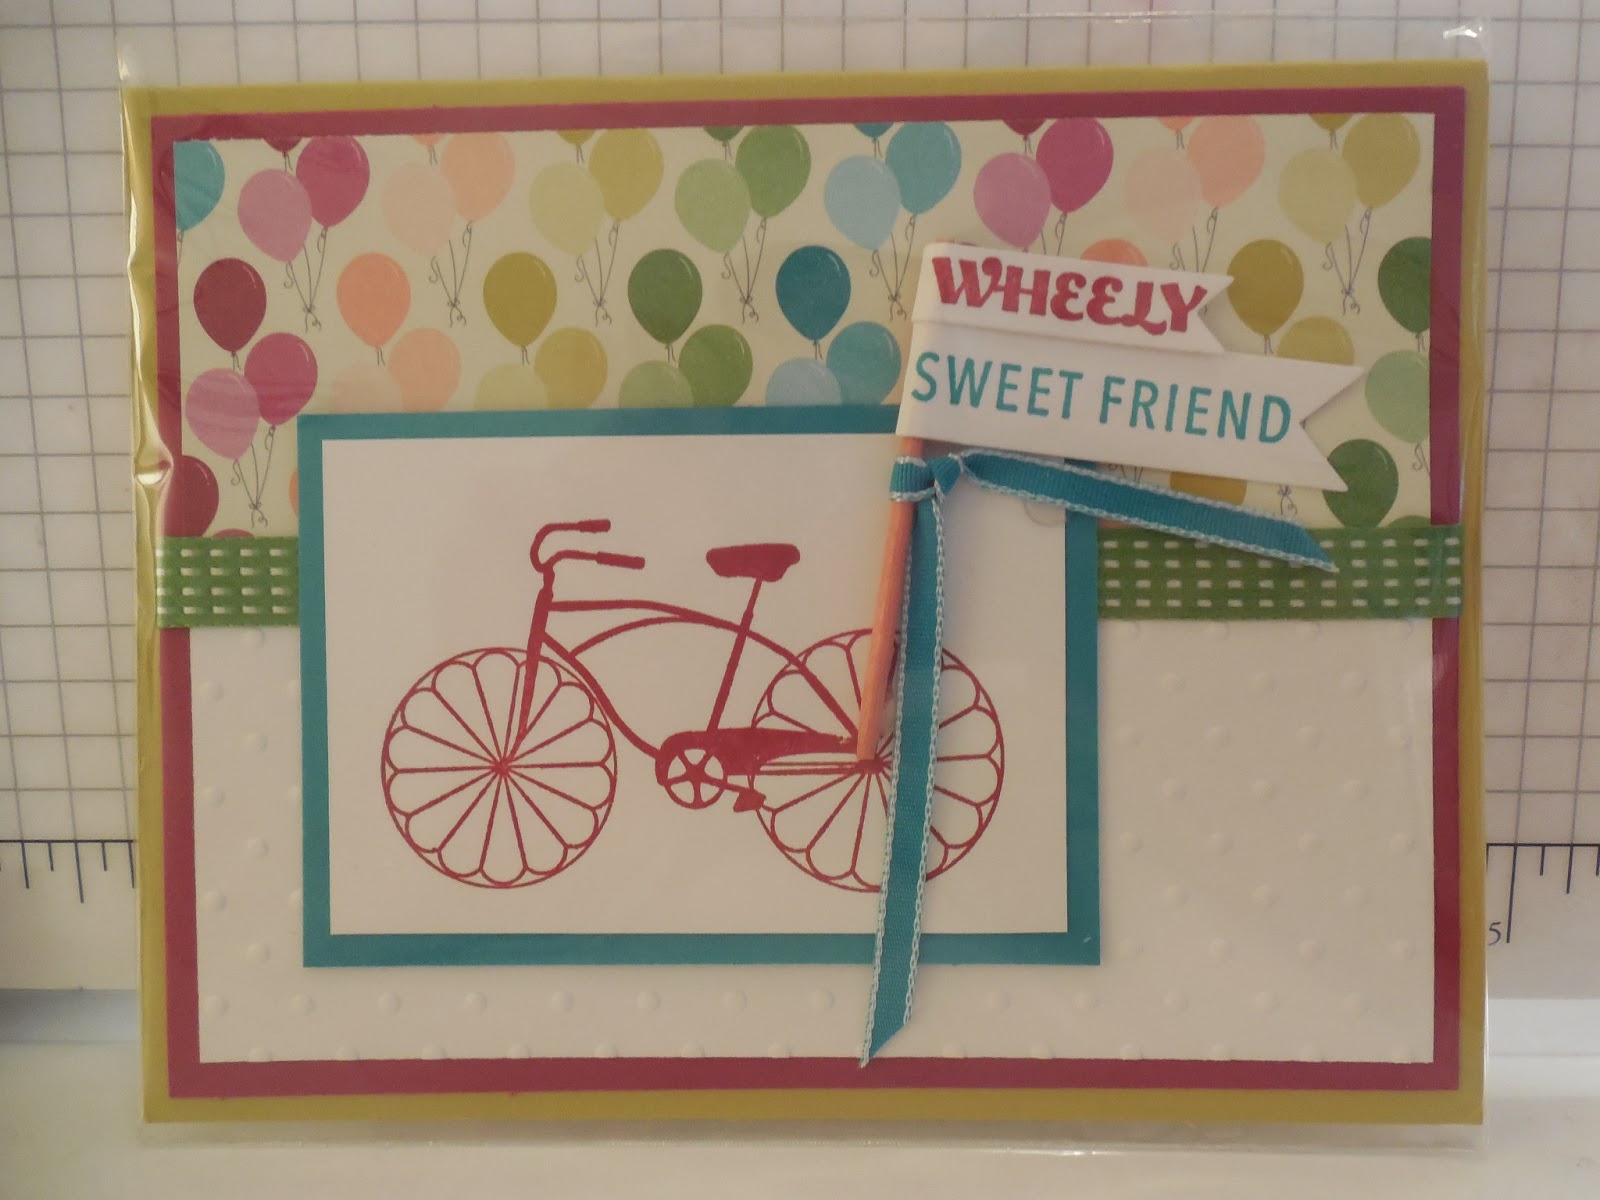
Card Seventeen:  Julie Coyle has created a really fun friendship card using the Cycle Celebration 6 piece stamp set on page 10 of the catalogue to stamp the wonderful antique bicycle and sentiment.  Her base card is Summer Starfruit to which she has added a layer of Raspberry Ripple card stock.  This is topped with a strip of Birthday Basics DSP and Whisper White card stock that has been embossed with the Perfect Polka Dots Embossing folder. Julie used a strip of Gumball Green 3/8" Stitched Satin Ribbon to separate the DSP and Whisper White sections of the card.  Another really cool feature of this card is the little banners or flags stamped with the words "Wheely" and "Sweet Friend".  Julie used markers in Raspberry Ripple and Bermuda Bay to stamp these images.  Finally, she's added a small piece of 1/8" Bermuda Bay Taffeta Ribbon to the little flag pole for extra pizzazz!   Amazing card Julie, I luv it and so do my friends! Thanks for sharing.

Card Eighteen:   I love getting post cards in the mail from exotic places.  This post card was no exception. It has a whole lot of stamping on it and is simply stunning.  The card was created by Susan Timchuck of Wilkes-Barre, PA.  Susan's card base is in Baked Brown Sugar cardstock.  What a yummy color and I love that name!  She stamped the image from the Post Card background stamp onto Very Vanilla Cardstock and then stamped the bicycle image from the Postage Due stamp set over that image.  Susan used Crisp Cantaloupe, Pistachio Pudding and Starfruit markers on this stamp.  She also stamped a portion of the En Francais background stamp onto the post card in Baked Brown Sugar Ink.  Wow that looks fantastic.  Other elements she added were a butterfly punched out with the Elegant Butterfly Punch, the date stamped with the Remember rotary stamp that coordinates with the This and That date products,  and a small paper clip from the Hung Up Cute Clips set.  Thanks so much Susan for such an exciting card!  Well done.

Card Nineteen:  Trisha Sheehan of Mukwonago, WI created this fun birthday card using the Birthday Cake single stamp on page 16 of the catalogue.  This is a great stamp for $10.95.  Susan made a tag from Whisper White card stock and stamped the cake image in Midnight Muse on this piece.  She has a strip of Cherry Cobbler Baker's Twine tied in a bow at the top of the tag.  The card base is in Wild Wasabi card stock and the face of the card was embossed with the Chevron Embossing Textures folder.  The sentiment "Carbs, Schmarbs! {Eat the Cake} is from the Yippee Skippee stamp set on page 37.  This was another FREE stamp set we received at convention so it was nice to see a sample of the sentiments on this card.  Thanks Trisha great birthday card!

Card Twenty:  This very pretty Basic Gray, Basic Black and Daffodil Delight card created by  Deb Andrews is such an awesome friend card. Deb has used the Butterfly Collection Wheel in Basic Gray ink on her Basic Gray layer.  A 2 x 3" piece of Whisper White card stock was stamped with the s En Francais background stamp in Basic Gray.  This is topped by a butterfly stamped in Basic Gray on Daffodil Delight with the Papilion Potpourri on page 90, and cut out with the Elegant Butterfly Punch.  The Yellow border strips are made with the Scallop Trim Border punch.   Great card.

I hope you'll leave a comment regarding this cards.  Thanks for visiting!

Wednesday, July 24, 2013

Convention Swap Card Share: Day One

As promised, today I'll begin featuring a selection of cards I received for participating in the 64+1 New Catalog Stamp Set Card Swap@ Convention,  as well as some cards I swapped along the way to various events.  

I hope you'll enjoy these selections as much as I am and will leave a comment. I've been smiling ever since I received this exciting selection of cards.   And, if you recognize your card please leave a comment, I'd love to hear from you.  

I'll provide links to the card creator and products used as much as possible, but unfortunately some of the cards did not have any information accompanying them. Again, if one of these "unnamed" cards is yours, I'd loe to hear from you and amend my post with your name and link.  Okay so here we go!

Card One:
Our first card was created by Beth Martin using the Wildflower Meadow Background Stamp (pg 83) and Wildflower Meadow Embossing Folder (pg 191).  The background stamp measures  5 5/8" x 4 1/8". In case you didn't know, the Wildflower Meadow Embossing Folder also coordinates with the Gingham Garden Suite. You can buy this fantastic background stamp and coordinating folder as a bundle and save 15% (wood mount bundle #132735 and clear mount bundle #132985).   Beth has done a fantastic job of stamping this card.  The card base is Baked Brown Sugar and the 1st layer is Strawberry Slush card stock.  She's stamped her images on Very Vanilla in Strawberry Slush Ink, and the polka dots are from inking up her Perfect Polka Dots Embossing Folder.  The little "thankful for you" sentiment is from the hostess set Banner Greetings on page 202.  Ask me how you could earn this last stamp set for free.  Great card Beth!

Card Two:   Susan Gardner created this really enchanting welcome baby card using the Zoo Babies 10 piece stamp set on page 54 of the catalogue. Every character in this marvellous set is adorable.  Susan incorporated three characters from the stamp set with So Ho Subway Designer Series Paper in a real thrifty but cute way.  I also like how she added the smallest of the Basic Pearl Jewels for eyes on the elephant and rhino.  Super cute!  Any new mom would be thrilled to get this card.  Thanks Susan for sharing.

Card Three:  Kris Kok has created a super cute welcome baby card using the single stamp "Worth The Wait".   This wood mount only stamp offers terrific value at just $11.95 CDN.  It coordinates with the 1 3/4" circle punch and the 2 3/8" Scallop Circle Punch to give a very sweet layered look.  Kris has paper pieced the little turtles shell by stamping the image onto some Subtles DSP and then fussy cutting it out.  The shell is mounted onto the stamped image with dimensionals.  Kris has also added a cute touch by incorporating a small piece of the Crushed Curry Chevron Ribbon at the top of the card.  The Whisper White Layer of the card is embossed with the Perfect Polka Dots Embossing Folder and the Soft Sky layer was cut out with the Apothecary Accents Framelit and then embossed with the Stripes Embossing Folder.  Great card Kris............. loved it!

Card Four was created by Lynn Zautner (www.lynnspirations.com - Pinterest site).  Laura has used my now favourite colour combination Crisp Cantaloupe, Soft Skye and Crumb Cake for this lovely friendship card. Lynn has also used a strip of the Natural Composition Specialty DSP, which features shiny raised patterns that appear brown and glossy, for her banner.  The increasingly popular stamp set "Perfect Blend" was used for the coffee cup image and sentiment.  This three piece, two-step stamp set is economically priced at $13.95.The next detail I found really appealing was the way Lynn punched out the top corner of the Very Vanilla layer with the Scallop Trim Border punch and then added a circle of the 3/8" Ruffled Ribbon in Crisp Cantaloupe.  Wow nice touch Lynn!

Card Five:  Barbara Dykhouse created a beautiful card using the 3-piece Background Builders stamps on pg 119 of the catalogue along with one of the doilies from the Delicate Doilies 4-piece stamp set on pg 122.  Great combination!  I also love how Barbara used the new InColours - Crisp Cantaloupe, Baked Brown Sugar and Coastal Cabana for her card stock ink  and ribbon choices.  Love it.  Another cool thing that works for this card is the first layer which is embossed with the Modern Mosaic Embossing Folder.  This element just seems to pull the whole card together. Thanks Barbara for this very appealing any occasion card.

Card Six:  Sometimes the simpliest of cards pack the biggest punch.  I felt that way when I received Michele Robins-Keifer's perfect little wedding card.  Just the sweetest.  Michele stamped the flowers and sentiment using the "A Round Array" stamp set.  What a great value this set is, with a mixture of 8 sentiment and flower shapes for just $22.95 in wood mount and $17.95 in clear mount.  This stamp set is available in Spanish, French and English and coordinates with the 7/8" Scallop Circle Punch on page 182.  The card base is Wisteria Wonder followed by a layer of Whisper White that's been embossed with the Perfect Polka Dot Embossing Folder.   The sweet little banner sentiment is from the Banner Greetings Hostess Stamp Set, which you can earn for FREE with hostess dollars - ask me how.

Card Seven:  I was super excited to get this gorgeous swap card before the afternoon session on the final day of Convention.  It was created by Claire Ventre from Cincinnati, Ohio, who was sitting right behind us throughout the closing session.  Not only is this the first Christmas Card I've received this year, but it features this year's Ronald McDonald House stamp set "Tag It", which we received for FREE during Convention.  This beautiful stamp set coordinates with the Chalk Talk Framelit Dies (p. 187)and is available in English, Spanish, French and German.  Did you know that when you purchase the Tag It stamp set that Stampin' Up! donates $3.00 to the Ronald McDonald House Charities?  Such a great deal for everyone.  The Whisper White layer of this card is embossed with the Northern Flurry Textured Embossing Folder.  The last great feature I want to point out on this card is the super cute little bow. Did you notice it?   It's actually modeled after the bows on page 152 of the new catalogue, but this one is made with 1/4 inch Old Olive Grosgrain Ribbon (retired).  Love, love, love it!  I can show you how these bows are made, just come to one of my classes............. so much fun!

Card Eight:  Snowflakes anyone?  My second Christmas card came in a hallway swap with Jennifer-Buchanan-Springer from Bremerton, Washington.  Jennifer is a very special gal who I've so enjoyed meeting on a couple of occasions. Her beautiful card features the Snowflake Soiree and More Merry Messages stamp sets which are both still available as carryover stamp sets from last years Holiday Mini. To find these sets you need to go to Stamps in the on-line catalogue and when you open that selection there will be another option called "online only stamps", click on this link to see all the carryover on-line only stamps.   The snowflakes have been stamped in Marina Mist and Wild Wasabi for a beautiful colour combination.  Awesome card Jennifer!
Card Nine:  Connie Bjork from Pennock, MN designed this very sweet little " Thanks so much" card.  Connie has featured the Simply Sketched Hostess Stamp set featured on page 205 for the bird and sentiments on this card.  What a beautiful job of water colouring the bird on a small piece of water colour paper.  She's used the InColours designer series paper for the Bermuda Bay strip of DSP across the bottom of the card.  Before layering and adhering this piece she added a small strip of the3/8" Ruffled Rib bon in the Baked Brown Sugar.  Wow!  What an awesome combination.  Connie also added one of the small Very Vintage Designer Buttons tied off with some Linen Thread.  

Card Ten:  Another simple card featuring the Modern Mosaic Embossing Folder and the coordinating stamp set Mosaic Madness.  This stamp set coordinates with the Mosaic Punch on pg. 180, and in fact, you can save 15% in discount by bundling the stamp set and punch.  How's that for a great deal?  Check out the details on page 123 of the catalogue. Whisper White Taffeta Ribbon and some small Basic Rhinestones add some sophistication to this beautiful card which is stamped in Night of Navy.  Unfortunately I can't give the owner credit as there was no identifying information in the swap envelope.  Too bad this card is awesome! 

Card Eleven:  My final card today is simply awesome.  It was created by Julie Link of Inver Grove Heights, MN.  Julie's card features the stamp set "Wetlands", which is a 6-piece stamp set featuring three sentiments that look awfully similar to the retired Sincere Salutations greetings, and three image stamps.  Julie has stamped the reeds and small shore birds on her card.  So beautifully made.  This card features my favourite colour combination again - Soft Sky, Crisp Cantaloupe and Crumb Cake.  There's also some Early Espresso going on which really compliments everything. The Square Lattice Textured Embossing folder was used on the Soft Sky layer and it really pulls the card together.  Julie simply awesome, you know how to capture nature!

Tuesday, July 23, 2013

Be The Difference Convention Swaps - Tea Party Card

The "Be The Difference" Convention has come and gone, but  sharing my experience with you is just beginning.  Over the next few days I want to share some before, during and after experiences with you.  

To start, I'd like to share some pictures of my card prep for the awesome swap organized by Lori Souter and friends.  This was a 64+1 card swap and the theme was "New Catalogue Stamp Sets".  We were to receive one card for each new stamp set in the 2013-2014 catalogue. That's right 64 new stamp sets including hostess sets and wheels.

Unfortunately it didn't quite go as planned because of a mix-up in swapping times, due to a change in the Convention schedule.  It was unfortunate because I was really looking forward to being able to share all 64 cards with you.   

Regardless I'm blown away by the talent demonstrated in the cards I did receive.  And if over the coming weeks the ones I'm missing are posted, I'll provided some links so you can catch up on those ones too.  

So buckle your seat belts and come along for the ride, because I have some awesome swaps to share with over the coming week.  You're going to love them!

Here's My Tea Party Swap Card:

I made a total of 70 of these cards.  The numbers in the supply list below in brackets show the number of sheets of card stock it took to make these cards.

Supplies List:
  • Card stock:    Very Vanilla (35), Crumb Cake(19)
  • Ink:               Early Espresso and Crumb Cake
  • Stamp Set:     Cup of Tea
  • Accessories:
    • Stripes, Modern Mosaic Embossing Folders and Beautiful Wings Sizzlet, Big Shot Machine
    • Ovals Framelits
    • Large Tag Punch
    • Crumb Cake Taffeta Ribbon
    • Basic Rhinestones 
    • Adhesive, Sponge Dauber 
    • Sharp scissors for fussy cutting (a lot of that!)
 Pulling it together:
  
I tied 70 of these teeny little Crumb Cake Taffeta bows using the "fork method"There is virtually no waste when tying ribbon this way and you ensure all bows are uniform.


The little butterfly only needed a small scrap of card stock so I cut out some 1" x 8 1/2" strips of Crumb Cake and then cut these down into 1" strips.  As you'll see in the photo below, I adhered these butterflies to the tags using glue dots.  A small basic rhinestone was added for a little sparkle. 

I punched out 70 of the Large Tags from Crumb Cake card stock.  I stamped 70 of the Thank you  stamp images on Very Vanilla, then fussy cut them out and mounted them to the Crumb Cake with adhesive.  I re-stamped the Thank You image in Early Espresso Ink on Very Vanilla and then cut out just the "Thank You" banner and adhered these pieces to the tag.  Everything was then sponged with Crumb Cake ink. 

I stamped the Cup of Tea image in Crumb Cake ink onto the center of each of the Very Vanilla Layers using the Stamp-a-ma-jig to ensure the ovals were centered on the card, and then removed the ovals with the Oval Framelits Die.
Once the oval was removed this layer was embossed with the Modern Mosaic Embossing Folder.  I did all the sponge daubing with Crumb Cake ink prior to embossing the layers. 
I loved the shabby chic look of this layer once it was embossed.

I stamped the oval image in Early Espresso on Very Vanilla card stock and then fussy cut all the top and bottom designs away.  I mounted these onto the Crumb Cake oval with adhesive.  Basic Rhinestones were added to three of the circle flourishes on this element.  I was carefully when cutting away these pieces and as a result will be able to use the Cup of Tea images on another project.
I broke all the tasks into 7 groups of 10 pieces, so I could check to make sure I had enough of each element when I began to assemble the cards.  This photo shows a grouping of 10 tags, ovals, butterflies, ribbons and embossed pieces  ready to be put on the cards.

This picture shows my seven piles of card pieces.   Each pile consists of 10 of every layer and element used on the card.
This picture shows the 10 piles of completed cards prior to being placed in their plastic sleeves. 
 
Here you can see a closeup of the detail in the finished card.

The finished card. Ta Da!

Let me know what you think.


Saturday, July 20, 2013

Convention News

Have you missed me?  It's been a while since I posted, but I've been at Stampin' Ups! Be The Difference Conference in Salt Lake City since last Wednesday.  What a week of excitement! Almost 6,000 women representing Stampin' Up! in the United States, Canada, German, England and Australia were gathered.

I've met old and new friends, learned new skills, attended seminars, tried new products, watched amazing demonstrations from some of the international demos, won prizes, and of course had way too much fun.  I've got so much to tell you!

Over the next week I plan to share my pictures and memories of those fabulous Convention moments and also all the exciting news about new products and promotions. Right now I'm packing to go home, so stay tuned as I put together the story.  It's going to be exciting!  

Monday, July 15, 2013

Want to Join My Team ?


Doing  what I love, and sharing what I love with others are just a few of the benefits that made me decide to become a Stampin' Up! demonstrator. 

I love sharing my passion for stamping with family and friends, meeting new people, and being a hobby demo.  I also get my own schedule and that is a definite plus!  

If you have a passion for stamping and want to share your creative talents with others, expand your hobby or just save on your Stampin' Up! supply orders, now may be the time for you to consider being a Stampin' Up! demo too!  For more information and a video on reasons to become a Stampin' Up! Demo click here:

I've reached the Consultant Level in Stampin Up!  I'm ready to move up once my team expands.

Right now the Stampin' Up!s New Demonstrator Kit is completely customizable!  That means you can build your very own Starter Kit you own way.  For $125.00 you get:
  • Your choice of up to $155 worth of any current Stampin' Up! products,
  • and a  business supply pack valued at $70
That's a total of $225.00

But wait there's more free stuff coming!

During July 15th to August 31st, if you sign up and join my team you'll get to pick one of four project kits for free in addition to your great starter kit. How's that for a great incentive? 

Three of the above kits haven't been released yet to the public because they're part of the new Holiday Catalogue product line and they're packed full of great items. You won't want to miss out on this special offer.  


 Click here for the flyer and more details and let me know when you want to sign up. I'll be happy t o answer your questions and help you through the process.


Friday, July 12, 2013

Buy 3 Get One Free


During the month of July Stampin' Up! is offering a great promotion on their fabulous Designer Series Papers and you'll want to take advantage of this money saving offer.  

Between July 1st to 31st, you can purchase any three packages of Designer Series Paper* and choose a fourth package for free.

It's a great deal and a great time to stock up on Designer Series Paper, so you're ready to roll when your creative spark kicks you into high gear.  Click here to see the full promotion and details:

Note:  *This offer does not include Designer Series Stacks and Speciality Designer Series Papers.

Atlantic Hearts Sketch Challenge #572:

April has sure been living up to its reputation for rain showers but it's been really on the cold side which isn't normal for this t...