Showing posts with label holiday home. Show all posts

Sunday, December 28, 2014

Cards from my Friends


As a child, it seemed like all the count down and hoopla to Christmas was endless and the days were extra long.  As an adult the days before and between Christmas and New Years seem to have become a blur, and are here and gone before you can yell "St. Nick". 

This year is no different.  Another Christmas has come and gone and it's almost time to clear up the decorations and put away all my treasures for another year.  But before I do I thought I'd take one last look at the beautiful handmade cards I received from friends and family that put a smile on my face for the season. So, here we go:


This beautiful screen card created by Phyllis and featuring Holiday Home, was one of the first Christmas cards I received this year and it totally blew me out of the water.  You could have literally heard my jaw hit the ground when I took it out of the envelope.  I've shown this card off a lot since receiving it, and I think you'll agree with good reason. 

Holiday Home is a 24 piece Photopolymer stamp and coordinating die set that can be purchased in a bundle.  It comes in English, Spanish and French. 
The detail in Phyllis' card is incredible.  Each tiny piece has been cut out and decorated with the utmost care. 

I even love the way Phyllis used a cloud to write her Christmas wishes on, and incorporated it into the screen.  Well done! 

Here is another exceptionally beautiful card I received from Cheryl Lefore.   Cheryl used the Wonderous Wreath stamp set for this gorgeous card.  There is a lot of dimension and detail in this card and to protect it from being flattened in a normal mailing envelope Cheryl sent it in a clear plastic mailing envelope.  That in itself was like getting a present.  Talk about exciting!
The word Joy was cut from gold foil card stock using the Wondrous Wreath Framelit dies and was attached to the wreath with dimensionals.  The little berries are actually clear red seed beads all individually glued on. 
Here's the little plastic envelope that protected this card so well.  I'LL have to make or get me some of these!
I wish you could see all the embossing in this beautiful Poinsettia card from Betty Lee. She quite literally is the Queen of Embossing in my books! Not only did she emboss the beautiful sentiment on this card, but she has masked the leaves of the poinsettia and embossed the center of the flower in red.  A simply beautiful card inside and out!

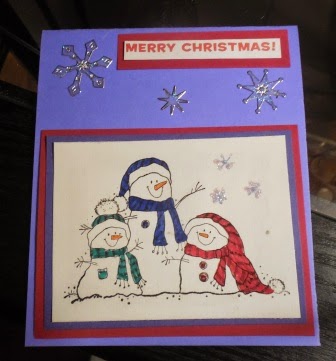
This last card was made by my dear SIL Elise.  What a creative person she is.  She always sends me the best cards.  Love those snowmen, they're so much fun!    
These aren't cards, they're my beautiful Christmas Cyclamens on my front porch, but I just had to share this picture. They've been blooming for two months now and even though the temperatures are really cold, they're hanging in there.
Well that's it for today's post.  I have more cards on the way, that have been caught up in the mail, so when they arrive I'll be sure to share them.  Thanks to Phyllis, Betty Lee, Cheryl and Elise for their beautiful cards, I was so overjoyed to receive them.  Hope you enjoyed these. 
Happy Stampin!
Penny Tokens

Monday, December 22, 2014

Holiday Home Christmas - A Cased Christmas Card


When you come across a card that makes you just stop in your tracks and suck in your breath, do you try to re-create it? That's precisely what happened to me when I stumbled on a card by Carol King. I just had to drop everything and make my own version.

I found this card originally created by Pam Stoner of Florida and then cased by Carol King of Perth Australia on Carol's blog, King's on Paddington.  

Carol wrote an excellent tutorial on how to add all the details to this card, so, I won't go into any great dialogue here other than to say, this card is truly amazing.  I followed Carol's tutorial and came up with 35 cards of my own which I happily sent out to customers and friends for this Christmas. I've also shown other stampers how to re-create this beauty.  

Here's Pam Stoner's original card:
 
Original card created by Pam Stoner and posted on her blog Pam's Paper Playhouse
Here's Carol King of Kings on Paddington version:

Carol changed up her version of Pam's card and created a wonderful tutorial which you can find on her blog by clicking on the link above. 

Here's My Version of both cards, done my way:


Supplies:
Stamp Set:  Holiday Home with Coordinating Framelits, Lovely as a Tree and Gorgeous Grunge
Card Stock:  Real Red, Night of Navy and Whisper White 
Ink:   Night of Navy, Soft Sky, Marina Mist, Always Artichoke, Whisper White, Real Red and Smokey Slate
Accessories:  Sponge Daubers, Perfect Polka Dots Embossing Folder, Oval Framelits, Post it Note sheets for masking, White Embossing Powder, Dazzling Details, Big Shot, Stampin' Up! Trimmer, Dimensionals and adhesive. 


Here's Some Variations of My Version:
I love all the dimension in these cards.  The trees looked like they were were real!


If you received one of my card's these cards from me this Christmas I'd love to hear from you.  Leave me a comment after this post.

Merry Christmas and Happy Stamping!
Penny Tokens

Sunday, December 21, 2014

"Moving" Box Card

Don't let the title of this post fool or confuse you.  The card I'm about to show you is one I made for my dear friend Gwen who recently moved.  

I wanted to make her something special for the occasion, and since Box Cards  always seem to pack so much "wow factor" I decided to make one to congratulate her on her decision to move and to send best wishes along with her. 

As I looked through my stamps I immediately thought that "Holiday Home" would be the perfect stamp set to use, and I think you'll agree when you see the full card that it worked perfectly. 

Here's My Card:  

Supplies:
Stamp Set:  Holiday Home stamp set and coordinating Framelits, Sincere Salutations and Gorgeous Grunge, miscellaneous stamp for scrollwork on ovals.
Card Stock:  Early Espresso, Whisper White and Crumb Cake 
Ink:  Early Espresso, Whisper White, Crumb Cake 
DSP:  Champagne Glimmer Paper, Trim the Tree Paper Pack
Accessories:  Oval Framelits, Itty Bitty Accents Punch Pack (Star), Window Sheets, Trimmer, Big Shot. Crumb Cake Seam Binding, Basic Rhinestones, Neutral and Subtle Markers

How It's Made: 
Box:
1.  Cut an 8 1/2 x 5 1/2" piece of Early Espresso for card base (box).  Score this piece at 2 3/4" (with the 5 1/2" side on top).
2.  Turn card stock so the 8 1/2" piece is on top and using your Stampin' Up! Trimmer, score to the middle line (the 2 3/4" mark) then cut the rest of the way down.  Score as follows:
  • Score at 2" then cut
  • Score at 4" then cut
  • Score at 6" then cut
  • Score at 8" then cut 


Note: There will be a 1/2 inch tab on the end after the final score.  Cut off to the score line and then on an angle on bottom portion of tab.  This tab is what holds the box together.  See picture below.

This picture shows the card base on the bottom and the insert on the top. The bottom of the card base is solid.  Also you can see how the tab on the end is cut in this picture. Note: The ends of the insert piece should be facing in different directions, not as shown above.  Oops!  My mistake.
Insert:
Cut a piece of 2 3/4" x 8" piece of  Early Espresso card stock and score it at:  1/2", 2 1/2", 3", 5", 5 1/2" and 71/2".  Fold  on score lines with mountains and valleys into a "Z" shape with a flare (the ends of the Z should be going the opposite way.  This piece will fit into your box when it's assembled and is the foundation for your elements to be attached to. 
Here you can see the "Z" fold shape.  I add sticky strip to the ends and then carefully fit it into the box making sure the rows are going side-to-side, not end to end. 


Card Stock and DSP Layers:
1.   For the last panel of the card base cut the following:  one piece from Crumb Cake card stock measuring 1 7/8 x 5 3/8" and one piece from Whisper White card stock measuring 1 3/4 x 5 1/4"

2.  For the outside bottom panels cut 3 pieces of Crumb Cake to measure 1 7/8" x 2 5/8".  Cut three pieces of the Early Espresso Designer Series Paper with tree design measuring 1 3/4" x 2 1/2".

3.  For the upper panels cut 4 pieces of Crumb Cake card stock to measure 
1 7/8" x 2 5/8" and four pieces of Crumb Cake Designer Series Paper measuring 1 3/4" x 2 1/2"
 
Bottom and back panels for the outside of the box card.


Top Panels for the inside of the card. 

 Start assembling the outside of the card first by adhering the crumb cake panels starting with the largest one on the left hand side beside the tab. Note:  before I glued my card stock and DSP panels down, I lightly sponged the edges with Early Espresso ink and crumb cake.  I also stamped the house, lamp and sentiment on the long strip of Whisper White card stock before adhering it to the back Crumb Cake panel.  


Repeat with the Crumb Cake and DSP Panels for the inside top of the card. 

Note:  I stamped the dots splash from Gorgeous Grunge in Whisper White ink on the Crumb Cake DSP to add some additional snowflakes before adhering it to the top panels.


Once all the panels are adhered to the card base assemble the box by adding sticky strip to the tab and then folding the card over onto itself to ensure it seals properly. 
In this picture you can see the sticky strip on the end tab.  I used two pieces to make sure it sealed the box tightly. 
In this picture you can see the card folded over on itself.  The sticky strip is on the left of the stamping.  Make sure you burnish the seam to ensure it is stuck down securely. 
Fold three of the front flaps down before placing the insert inside the box.  The back panel remains stationary.

Decorate the fronts of the side panels with sentiments and elements of your choice.  For mine I stamped images of the houses from Holiday Homes and coloured them with markers (Crumb Cake, Early Espresso and So Saffron) and the sentiments "Good Luck" and "happy new home".  I also added some Champagne Glimmer paper stars that I punched out with the Itty Bitty accents star punch and some basic rhinestones for some added glam.  I cut out a tag with the 
For the front sentiment I cut two nesting ovals with the Ovals Collection Framelits using Whisper White Card stock and Early Espresso.  I stamped "Good Luck" from the Sincere Salutations stamp set and some flourishes in Crumb Cake with another stamp.  I added a small Champagne Glimmer Paper Star and a bow from Crumb Cake Seam Binding. 

Put sticky strip on sides of the insert and shape into a "Z" fold and then place inside the box opening.  The panels will go left to right and should be spaced about 1/2" a part.  You may have to do a little adjusting before burnishing the sides to make sure they are stuck down. 

For the elements for the inside of the box, I stamped the three different house images from Holiday Home on Early Espresso and Crumb Cake cardstock with Whisper White ink and cut them out with the thinlets. 


The house images were mounted using 1/2 by 3" strips of window sheet material.  I used glue dots to make sure the images were secured both to the window strip and to the insert base.  You have to fiddle with these elements once you have them mounted on the window strips to get the fit you're most comfortable with.  I also added some gold stars and a sentiment. 

Note:  Make sure when you add the elements to the center that you open and shut the card to ensure that the elements aren't sticking out beyond the card frame.  If they are the card might not shut properly or fit in a standard card envelope.

I didn't like the look of the unadorned Early Espresso top panels when the card was closed, so I stamped three more houses and cut some additional Crumb Cake and DSP panels and added them.  I think they made the card look so finished.  Here they a below:

I stamped two houses on Crumb Cake and one on Early Espresso card stock with Whisper White ink.

I like the look of the two DSP panels with the house mounted on the top half.  It seems to complete the card. 

The finished back of the card.  the house was stamped on the Whisper White panel in Early Espresso ink and then I stamped a second house, cut it out and coloured it and mounted it over the first one with dimensionals. 

I hope you enjoyed this tutorial and my card.  I'm going to leave you with pictures of two more "birthday" box cards I made this fall - one was for a neighbor's birthday and the other for a  good friend 's October 31st Halloween birthday.  What fun! Enjoy and leave me a comment if you like these. 

I had a lot of fun making this card.  The balloons came together so quickly and the DSP worked well to pull the card together.
 
 
I used a miss-mash of Stampin' Up and other products to create this card.  You may recognize some of the stamp sets and dsp.  Enjoy!


Happy Stampin!
Penny Tokens

Atlantic Hearts Sketch Challenge #572:

April has sure been living up to its reputation for rain showers but it's been really on the cold side which isn't normal for this t...