Showing posts with label Stampin' Up. Show all posts

Friday, October 21, 2022

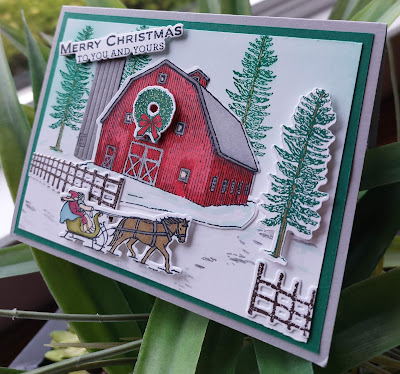
Christmas Barn by Stampin' Up!

Before I made my own Christmas cards I used to purchase ones that featured winter snow scenes.  I think that had a lot to do with my delight when I first saw the Christmas Barn stamp set and dies in Stampin' Ups! Holiday mini catalogue. 

Although this bundle which includes the Christmas Barn Stamp Set and Barn Dies has become a wonderful addition to my Christmas Occasion stamps it could just as easily be used at other times of the year.  


There are nine photopolymer stamps including a rustic barn, a traditional wooden fence, a horse-drawn sleigh, a wreath and tree plus three three wonderful holiday sentiment stamps. And, the 14 barn dies making creating the scene even easier. The 14 piece Barn Dies include a barn, silo, frozen lake/pond, snow flakes and a sign post as well as dies that give a fussy cut look to some of the sentiments.

Here is my card: 
Even though I'm not an artist I felt like one while I was creating this peaceful and nostalgic winter scene.   I began by layering a 5 1/4" x 4" piece of Shaded Spruce card stock over a standard size Smokey Slate card base.  The stamped layer is a 5" x 3 3/4" piece of Whisper White card stock.  I used scraps from my Whisper White collection to stamp the barn, tree, fence and sled and coloured the images with Stampin' Blends before die cutting them with the coordinating Barn Dies.  

I used Pool Party ink for the sky portion of this layer.  I made the mistake of adding the sky colouring after I had stamped the trees and the Shaded Spruce ink blurred a bit.  Next time I'll do the sky first.  The silo was die cut from a scrap of Smokey Slate card stock and I used a Smokey Slate blend to give it a bit of texture and shadow.  I also used Smokey Slate Blends in light and dark to colour the roof, window and door details on the barn.  

I purposefully kept the inside of the card clean and simple.  The next time I stamp with this photopolymer sentiment I'll make sure to line it up a bit better.  With photopolymers it's always good to lay them out on a grid just in case they have a bit of a curl to them. The whisper white layer measures 5 1/4 x 4" and I stamped the images with Shaded Spruce ink. 


The "Merry Christmas To You and Yours" was cut with its coordinating die and I love how it turned out.  It was a little tricky lining up the stamped image with the die cut so I think the next time I want to use this sentiment I will start by making a template to use in my Stamperatus rather than stamping with the Acrylic block and lining up the die cut.  It's easier to make multiples that way.  

There is a small stamp that looks like tracks in the snow.  I stamped a little path going up towards the side of the barn and a few beneath the horse and sleigh in full strength Smokey Slate ink.  

The die cut for the fence is very detailed. I stamped the fence in Early Expresso ink on Whisper White card stock before die cutting it.  The white edges around the die cut image almost look like snow so I was happy with that.  I attached small strips of Dimensionals behind the fence rails to give the fence depth and full sized Dimensionals behind the sled, the single stamped tree, and wreath on the barn front for the same effect.  

Real barns rarely have beautifully even colouring and lean more towards mottled dark and lighter hues from all the layers of paint that have been applied over the years.  So when I began colouring this barn in light and dark Real Red Stampin' Blends, I kept that in mind.  I began by outlining all the doors and windows in the darker red before colouring in the larger red areas and shading in around the eaves and base of the barn. This made the colouring go much faster, especially the shading and I think it stopped the inevitable bleed you get with alcohol markers and dark inks.  

I originally was going to adhere the wreath over the top window on the barn, but I read in someone else's post that it worked better when it was spaced between the three windows.  I'm glad I made the change as it really did look better.  I added a little bit of Daffodil delight to the windows for a cozy glow.  

Well that's it for today's post, I'm dying to get back to my craft room and make some more cards with this stamp and die set.  I'm loving it!  Leave me a note to let me know if you like this card and if you like creating scenes too.  

Cheers and as always 


Happy Stamping!
Penny Tokens Stampin' Spot

Penny Hanuszak, CDN Independent Stampin' Up! Demo


Monday, August 15, 2022

Hippest Hippos Really Rock!

I'm suffering from cuteness overload this week and it's all because of the Hippest Hippos Stamp Set and matching dies I got for FREE from the Stampin' Up! Sale-a-bration sale that's going on until the end of this month.  Have you seen this set?  If not check it out:


These three hippos are sure to bring smiles, whether they are stamped individually or grouped.  Just think of all the fun combinations you can make. You can get this stamp set Free until the end of August or while supplies last with the purchase of $60 CDN in Stampin' Up! Products (before s&h and tax).  

There is also a Hippo Die set in the Sale-A-Bration flyer that coordinates with the Hippest Hippos and it really is a must have for making these cute cards.  Again it is FREE with the purchase of $60, CDN in Stampin' Up! Products.  

Here are a few of the Hippest Hippo cards I've made:

Although these cute Hippos are perfect for a child's birthday card, I think a few of my adult friends would also get a kick out of them.  Prior to making these cards I stamped a whole page of Hippos - all three images - and coloured them with Stampin' Blends.  I experimented to see which colours I liked the best, and then used the dies to cut out the Hippos and all the accessories.  Then I got to work.  

My first card features the little Hippo holding a flower stem.  So cute!

The background was created with a blending brush and Tahitian Tide ink on this quick and easy card.  The hippo's body is coloured with light and dark Smokey Slate blends and I used Grey Granite on his tummy and muzzle.  So sweet!  This card came together in minutes but it's sure to get big smiles when I send it out later this month.  

My second card is a slimline birthday card featuring all three of the hippo images in all their cuteness!  The Tahitian Tide card base measures 8 1/2" by 7" and is scored at 3 1/2".  I've added a 3 1/4" x 8 1/4" mat in Sweet Sorbet, followed by a Whisper White mat measuring 3 1/8 x 8 1/8".  


I used blends to achieve the cloudy sky and made a stencil pattern using the cloud border die piece from Basic Border Dies.  Normally  I would use Pool Party ink when blending in the clouds, but today I decided to use Tahitian Tide and I was really pleased with how light the colour was.  I'm sure this will be my new "go to" colour for skies.  I created a sandy base by stamping the ground image from Paradise Palms to give a layered look.  This was stamped with Sahara Sand ink.

I used the rounded die which looks like clouds at the top of the picture .  

I've used the same matting format for the inside of the card which features the Hippo Ballerina.  


My third birthday card features two of the Hippos on a stenciled background. The Hippos are coloured with Light Gray Granite and Light and Dark Smokey Slate Stampin' Blends.  The sentiment is from the retired Many Messages stamp and die set. 


The inside of this card features the Happy Birthday sentiment from the retired Perennial Birthday stamp set and the "hope you find a little paradise....." is from the Paradise Palms stamp set.  The flowers and leaves are part of the Hippo Die cuts.

My final card features a lot of the dies from the Hippo Die set and it was super fun to create. I repeated the Tahitian Tide cloudy sky technique to begin the background and the Sahara Sand for the beach.  I stamped the three Palm Trees using garden green and Early Espresso markers.  I stamped the son directly on the card stock and then masked it off during the blending phase of this card.  Wow the background is really great looking!


This little hippo is all decked out with his snorkel and mask and little brown boat.  What fun!  


Well that's it for now.   Hope you'll write a comment and let me know if you like these type of cards.  I'd love to hear from you.  Until next time.........

Happy Stamping!
Penny Tokens Stampin' Spot 


Wednesday, March 17, 2021

FREE SHIPPING - ST. PATTY'S DAY SPECIAL - ONE DAY ONLY!


Happy St. Patrick's Day!  Have you heard the news?  For the next 24 hours Stampin' Up! is offering FREE SHIPPING on all qualifying orders.  

That's right!  Order a minimum of $65.00 CDN on March 17th and you will get free shipping anywhere in Canada.  Why not stock up and save on your favorite Stampin’ Up! products today?  


ORDERING INFORMATION:

  • All order types qualify for this promotion (customer, demonstrator, workshop, and online).
  • Free shipping applies after the minimum qualifying amount of  $65.00 CDN has been met (before tax).
  • Apply my March Hostess Code and you'll also receive a small gift from me and a Thank You for your special order. 
  • Free shipping only applies during the 24-hour period the promotion is live,  this means that the order must be opened and closed on 17 March 2021.
  • With the exception of month-to-month Paper Pumpkin subscriptions, all Stampin’ Up! products qualify for the promotion.
  • Prepaid Paper Pumpkin subscriptions are eligible for FREE shipping under the same rules as all other Stampin’ Up! items during the promotion.
  • Month-to-month Paper Pumpkin subscriptions are NOT eligible for free shipping. Subscriptions billed and shipped this month will be charged for the normal amount $30.00 CAD shipping included) + tax.

ORDERING DEADLINES:

Phone: Wednesday, 17 March 2021; 6:50 pm (MT)

Online Ends:   Wednesday, 17 March, 2021;  11:59 PM (MT)


MARCH HOSTESS CODE:   


Click here to visit my 24 hour On-Line Store


Happy Stamping!
Penny Tokens Stampin' Spot


Penny Hanuszak, Canadian Independent Stampin' Up! Demonstrator


Monday, November 9, 2020

Warm and Toasty Snowflake Card - Freshly Made Sketches 460

This week Judy at Freshly Made Sketches has chosen a sketch that has plenty of room for stamping and adding details.  Here is her sketch:

Here's My Card:


My card features the Polar Bear from Stampin' Up!s Warm and Toasty stamp set. What fun I had colouring this big guy. 


I used Pool Party, Misty Moonlight, Balmy Blue and Smokey Slate Blends.  The beautiful snowflake filled designer paper is called  Snowflake Splendor.


The inside of the card has a strip of the gorgeous Snowflake Splendor designer paper and a sentiment from the Warm and Toasty stamp set.


Well that's it for today's post, I hope you like this card.  Drop by and leave me a comment I'd appreciate hearing from you.  


Happy Stamping!
Penny Tokens Stampin' Spot 
Penny Hanuszak Independent Stampin' Up Demo 

NOVEMBER HOSTESS CODE:  ZZ49FQKS
Apply the hostess code at the end of your order if it is less than $200.00 before s&h.  I will send you a free gift.  If your order is over $200 don't worry you'll earn Stampin' Rewards and be able to pick out your own free gift.  Thank you cards for all orders. 
Click Here to Shop 24/7 at my Online Store

Wednesday, February 28, 2018

WWC#159 - Marsha's "All About Christmas" Challenge

Hi Stampers.  Thanks for dropping by for the Watercooler Wednesday Challenge which is being hosted by Marsha and is "All About Christmas".  It's never too early to get working on your cards for next season and to that end, Marsha is challenging you to build your Christmas stash by making a card and posting it on this site.
Once you've made a card just snap a picture of it, post it on your blog, Facebook or other Social Media site, and then add your link to our LINKSKY at the bottom of our challenge page. The WWC158 Challenge is open until 5:00pm Mountain Time Monday March 5th, 2018.

Here's My Card:
My project for this week involves a very simple fun fold technique that creates an amazing WOW card.  This card is called a Bridge Fold and it's one of those cards that can be dressed up or down and used for any occasion.  Here's mine:

Supplies:
Card Stock: Whisper White 
DSP:  Merry Little Christmas (R Holiday2017)
Specialty Paper:  Silver Foil 
Accessories:  Paper Trimmer, Big Shot, Silver Foil Christmas Stickers from Simply Creative. Home Town Greetings Edgelit Dies, Dimensionals, Foam Tape,
Detail Scissors.

Details:
The Bridge Fold card makes for a terrific WOW card and can be made with many variations. The bridge piece can be made wider, it can be decorated, it can even be made with a window sheet so it's transparent and there are also different sizes of cards. 


Whatever style you choose, the Bridge Fold is simple to make and very impressive to look at. And, last but not least, the best part of all is that you can make two cards from one sheet of 8 ½” x 11” cardstock. It folds flat and can be sent in a standard A2 envelope. Gotta love that!
 

1. Cut base card stock to 8” x 4 ¼” and score at 1 ¼”, 2 ½” 5 ½” and 6 ¾”.


2. Cut four 1” x 4” pieces of card stock for mats.  I used Silver Foil. adhere to the two sides of the card base.

3. Cut four 3/4" x 3 3/4" strips of DSP and adhere to Silver Foil Mat.

4. Cut a 2 3/4" x 4" Silver Foil Mat for center of card and adhere.

5.
Cut a 2 1/2" x 3 3/4" piece of DSP and adhere to the Silver Foil Mat. Note: If you just intend to stamp a sentiment or write a note sub out the DSP for Whisper White card stock or colour of your choice, and do stamping or writing before attaching the bridge.


For the inside panel I cut out images from the Home Town Greetings die cut set.  The church and house were attached to the backing with glue after silver foil inserts were added to the back of each of the buildings.  there are two rows of buildings and the second or outer one was mounted with Foam Tape. I used store bought silver stars and sentiments from Simply Creative and attached them with Tear N tape. 
6. For the bridge cut a 5 ½” x 1 1/4"” strip of Silver Foil Card Stock and a 1" x 5 1/4" strip of DSP adhere together.

For my bridge I cut out a wintery scene with the Home Town Greeting dies and positioned it over the DSP after attaching silver foil to the backs of each of the houses.  
7. To mount the bridge strip to the card base fold the left hand side of the card so that the outer flap is facing outwards.  Measure up from the bottom of the card for whatever placement you want and then adhere the strip only to the front left panel.

8.  Open up and lay the center and right side panels face up and attach the right side of the bridge strip to the last panel on the right. Note: The bridge panel is only attached to the far left and far right panels. Because this is the way the card will open and shut, I used Tear N' Tape to secure.

9.  The back of the card has ample room for writing a message.  Personally I would layer a Basic Black and Whisper White  panel using the same dimensions as in #5 and attach it to the back. This panel would be my sentiment and my message or I could make a slot to attach a gift card.   Like I said the possibilities are many.

Back view of the card showing ample room for adding a sentiment or a pocket to hold a gift card.  See my note above about adding mats.
And that's all there is to it folks. This is a fun card and there are lots of examples on Pinterest and You Tube. I hope that you enjoyed my Christmas Bridge Card and will leave me a comment about it. Let me know if you've ever made one and if so how did your dimensions very from mine. Were they the same or larger.

If you came straight here and haven't taken the time to see the other Watercooler Wednesday Design Team members creations just click here to go to the challenge.  All the rules for using the Linsky are on that page too.

Before I go I also want to share the sad news that Judy Markowitz has left our design team because of family health issues.   I personally am going to really miss Judy's originality and creativity, but hope that she'll still join in on the challenges when she gets a chance.  

In Judy's place, we are welcoming Tenia Nelson to our group of Watercooler Artists.  Tenia hails from Denver, Colorado and we've been wowed by her edgy and eye-catching creations in previous challenges.  


Happy Stamping!
Penny Tokens Stampin' Spot 

Wednesday, January 17, 2018

Watercooler Wednesday #WWC153 - Gail's Masculine "Anything Goes" Challenge

This past week has been so much fun.  It's been filled with good things like being with friends, playing cards, cooking Pierogies and entertaining.  All things that put joy in my heart.  The warmer weather and longer days are also contributing to my good spirits.  

Although I didn't have much time for stamping my thoughts were on it and I was able to design a card for the WWC153 at the Watercooler.  Gail Allen is our hostess and she's challenging you to step away from your comfort zone and make a "Masculine Card".

The WWC153 challenge is open for links until 5:00pm MST Monday January 22nd, 2018.  There's plenty of time.

Here's My Card:


Supplies:
Stamps:  Country Living, Gorgeous Grunge, Make a Wish (Fiskers)
Inks: Smokey Slate, Momento Tuxedo Black, Chocolate Chip, Early Espresso,
Card Stock:  Smokey Slate, Basic Black and Sahara Sand 
Accessories:   Paper Trimmer, Detail Scissors, Big Shot, Happy Birthday Thinlet, Tom Bow Adhesive, Gray Dots.


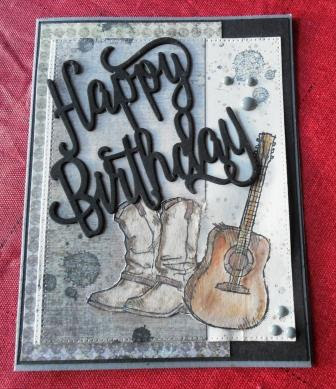
I made this card for a friend whose birthday is coming up soon.  He's into guitar picking and wearing boots, so this card is perfect for him.   I started with a Basic Gray layer for the card base and added a layer of Basic Black.  My third layer was a piece of Sahara Sand that I'd stamped the images on, but I kind of messed up on the stamping and had to cut it down  by a 1/4"  on all sides. Because this panel was so much smaller than I'd anticipated I layered on some   additional layers of DSP that I found in my scrap drawer.
I decided to use the Happy Birthday Thinlet for my sentiment on this card. The bold lettering was perfect.  Because this card is going overseas, I wanted it to be as light as possible and not too bulky.  By cutting two layers of the words in Basic Black and gluing them together, I was able to add a bit of texture and pop and keep the card weight in check. 

I coloured the boots with Chocolate Chip and Early Espresso inks that I'd watered down considerably.  I wanted the guitar to be the focal point so I coloured it with more intensity.  I has a bit of a sheen like a real guitar would. The basic gray dots and splashes from Gorgeous Grunge were added for more expression.

I kept the masculine feel on the inside of this card by adding a strip of the dsp and a piece of basic black card stock.  The sentiment is from an old Fiskars set I have called "Make a Wish".  I stamped it in Momento Tuxedo Black. 


And that's it for this week's challenge.  Hope you liked my card and will leave me a word of encouragement.  Don't forget to check out the entries by the other Design Team Artists at the Watercooler Wednesday challenge.

Happy Stamping!
Penny Tokens Stampin' Spot

Happy St. Patty's Day!

Rainbows, a Pot of Gold, Leprechauns green beer and shenanigans are all part of celebrating St. Patty's Day on March 17th. I have a sma...