Welcome to this week's Watercooler Wednesday Challenge. I'm happy to be your hostess this week and hosting a Feminine "Anything Goes" challenge. Last week's Watercooler Wednesday Challenge received over 50 amazing entries from stamping gals all over the world. This week I'm challenging you to beat that total and join me in making and posting a card or project with a Feminine theme. How cool is that?
Our challenge is open until 5:00pm on Monday February 12th Mountain Time. To participate just link your project to our Watercooler Wednesday challenge site through the Linksy at the bottom of the main page. Check out the rules we have posted and may be you'll Rock the Watercooler. What fun!
Here's My Card:
For my feminine card I chose to make a birthday card using stamp sets and embossing folders from Stampin' Ups! brand new Occasions 2018 catalogue and their Sale-A-Bration flyer.
Supplies:
Stamp Set: Amazing You (SAB-18) 147215, Picture Perfect Birthday #145519
Ink: Momento Tuxedo Black, Watermelon Wonder, Old Olive
Card Stock: Whisper White, Old Olive, Watermelon Wonder
Accessories: Big Shot, Simple Stripes and Scattered Sequin Embossing Folders, Everyday Jar, Stitched Shapes and Circle Dies, Aqua Painter, Paper Trimmer, Wink of Stella, Dimensionals, Basic Rhinestones and Facetted Gems.
Details:
This card began with a Whisper White card based measuring 8 1/2 x 5 1/2" and scored at 4 1/4".
The word "celebrate" from the Amazing You stamp set was stamped in Watermelon Wonder ink on a scrap of Whisper White card stock. I fussy cut around the sentiment and it was adhered with Dimensionals below the floral image. I stamped the word "You" from Amazing You in Old Olive ink below the floral image and the "Happy Birthday" sentiment was stamped on another scrap in Momento Tuxedo Black ink and cut into a small banner. Some basic rhinestones and a coating of Wink of Stella on the floral design finished off the card front.
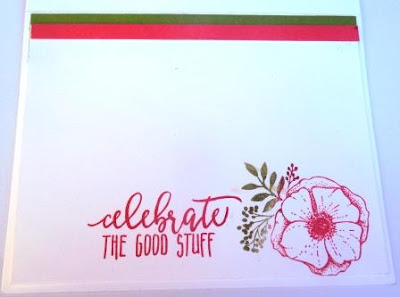
I stamped the floral image once again on the inside of the card and added the sentiment Celebrate the Good Stuff from the Picture Perfect Birthday stamp set to the inside of the card. Two 1/4" strips of Old Olive and Watermelon Wonder ink were added to the top of the inside panel.
Happy Stamping!
Penny Tokens Stampin Spot
Our challenge is open until 5:00pm on Monday February 12th Mountain Time. To participate just link your project to our Watercooler Wednesday challenge site through the Linksy at the bottom of the main page. Check out the rules we have posted and may be you'll Rock the Watercooler. What fun!
Here's My Card:
For my feminine card I chose to make a birthday card using stamp sets and embossing folders from Stampin' Ups! brand new Occasions 2018 catalogue and their Sale-A-Bration flyer.
Supplies:
Stamp Set: Amazing You (SAB-18) 147215, Picture Perfect Birthday #145519
Ink: Momento Tuxedo Black, Watermelon Wonder, Old Olive
Card Stock: Whisper White, Old Olive, Watermelon Wonder
Accessories: Big Shot, Simple Stripes and Scattered Sequin Embossing Folders, Everyday Jar, Stitched Shapes and Circle Dies, Aqua Painter, Paper Trimmer, Wink of Stella, Dimensionals, Basic Rhinestones and Facetted Gems.
Details:
This card began with a Whisper White card based measuring 8 1/2 x 5 1/2" and scored at 4 1/4".
I added the following layers:
- a 5 1/4" x 4" piece of Watermelon Wonder
- a 4 3/4" x 3 3/4" piece of Whisper White
- a 3 5/8" x 4 5/8" piece of Old Olive
- a 3/12" x 4 1/2" piece of Watermelon Wonder that was embossed with the Simple Stripes Embossing folder.
- two 3" circles cut from Watermelon Wonder and Old Olive embossed with the Sequins Embossing folder
- a 3" circle cut from Whisper White with the Stitched Shapes thinlet dies that was stamped with the Amazing You floral image, the sun, and the sentiment "you".
I stamped the floral image in Momento Tuxedo Black onto the 3" Whisper White Circle. I stamped it again on a post-it-note, fussy cut this and used it as a mask. I stamped the sun in Peek-a-boo Peach above the flower. The flower was coloured with an aqua painter and Watermelon Wonder Ink.
Thanks for dropping in and visiting my blog this week. I hope you enjoyed my project and that my tips on how it was designed were helpful. I love reading comments so before you go if you can leave me a few words of encouragement you'll make my day.
The word "celebrate" from the Amazing You stamp set was stamped in Watermelon Wonder ink on a scrap of Whisper White card stock. I fussy cut around the sentiment and it was adhered with Dimensionals below the floral image. I stamped the word "You" from Amazing You in Old Olive ink below the floral image and the "Happy Birthday" sentiment was stamped on another scrap in Momento Tuxedo Black ink and cut into a small banner. Some basic rhinestones and a coating of Wink of Stella on the floral design finished off the card front.
I stamped the floral image once again on the inside of the card and added the sentiment Celebrate the Good Stuff from the Picture Perfect Birthday stamp set to the inside of the card. Two 1/4" strips of Old Olive and Watermelon Wonder ink were added to the top of the inside panel.
So that's it for today for my Feminine "Anything Goes" Watercooler Wednesday project. I hope you liked it. I'd love to have your comments.
Don't forget to check out the other Design Team Artist's at the Watercooler Wednesday Main challenge page. To get a closer look at their creations simply click on their name below their sample picture. Until next time..........
Happy Stamping!
Penny Tokens Stampin Spot


