Showing posts with label "Birthday Cards" "Stampin Up" "Penny Tokens" "Pam Staples". Show all posts

Wednesday, January 17, 2018

Watercooler Wednesday #WWC153 - Gail's Masculine "Anything Goes" Challenge

This past week has been so much fun.  It's been filled with good things like being with friends, playing cards, cooking Pierogies and entertaining.  All things that put joy in my heart.  The warmer weather and longer days are also contributing to my good spirits.  

Although I didn't have much time for stamping my thoughts were on it and I was able to design a card for the WWC153 at the Watercooler.  Gail Allen is our hostess and she's challenging you to step away from your comfort zone and make a "Masculine Card".

The WWC153 challenge is open for links until 5:00pm MST Monday January 22nd, 2018.  There's plenty of time.

Here's My Card:


Supplies:
Stamps:  Country Living, Gorgeous Grunge, Make a Wish (Fiskers)
Inks: Smokey Slate, Momento Tuxedo Black, Chocolate Chip, Early Espresso,
Card Stock:  Smokey Slate, Basic Black and Sahara Sand 
Accessories:   Paper Trimmer, Detail Scissors, Big Shot, Happy Birthday Thinlet, Tom Bow Adhesive, Gray Dots.


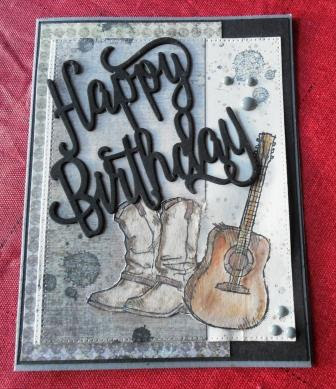
I made this card for a friend whose birthday is coming up soon.  He's into guitar picking and wearing boots, so this card is perfect for him.   I started with a Basic Gray layer for the card base and added a layer of Basic Black.  My third layer was a piece of Sahara Sand that I'd stamped the images on, but I kind of messed up on the stamping and had to cut it down  by a 1/4"  on all sides. Because this panel was so much smaller than I'd anticipated I layered on some   additional layers of DSP that I found in my scrap drawer.
I decided to use the Happy Birthday Thinlet for my sentiment on this card. The bold lettering was perfect.  Because this card is going overseas, I wanted it to be as light as possible and not too bulky.  By cutting two layers of the words in Basic Black and gluing them together, I was able to add a bit of texture and pop and keep the card weight in check. 

I coloured the boots with Chocolate Chip and Early Espresso inks that I'd watered down considerably.  I wanted the guitar to be the focal point so I coloured it with more intensity.  I has a bit of a sheen like a real guitar would. The basic gray dots and splashes from Gorgeous Grunge were added for more expression.

I kept the masculine feel on the inside of this card by adding a strip of the dsp and a piece of basic black card stock.  The sentiment is from an old Fiskars set I have called "Make a Wish".  I stamped it in Momento Tuxedo Black. 


And that's it for this week's challenge.  Hope you liked my card and will leave me a word of encouragement.  Don't forget to check out the entries by the other Design Team Artists at the Watercooler Wednesday challenge.

Happy Stamping!
Penny Tokens Stampin' Spot

Friday, October 28, 2011

A La Card Monkey - Any Occasion and Sketch: Monkey Sketch 80

Hi everyone.  Last week I had the thrill of finding out that my Spooky Cute entry into the  A La Card Monkey Sketch 78 challenge, had won me the honour of being a Monkey Princess and a Guest Designer spot in an upcoming challenge.  That had me swinging through the vines for sure!  Here's my badge of honour.

I was so excited to be chosen as a Guest Designer because the A La Card Monkey Design Team does such an awesome job of presenting amazing sketch challenges that are always fun and easy to do.  Plus these gals are just so darned nice and helpful I feel like they're all friends.  Anyway it was just a great thrill for me and I wanted to share my excitement and good news with you.

Monkey Sketch 80 - Any Occasion + Sketch:
Here's this week's sketch and I'm sure you're going to enjoy it.  In fact, I invite you to play along too.  I know some of you hold back on doing the challenges because you don't have a blog, well don't let that stop you.  For this challenge if you're one of my customer's or demos who doesn't have a blog but would like to join in the fun, simply forward your card to me electronically and I'll post it to my blogsite for everyone to see and comment on.  That will be fun for all of us!!!!


Although the sketch was for "Any Occasion", I chose to do a Christmas card.  I wanted my card to have the feel of an old ski lodge and someone standing looking out at the view, so I chose a stamp set that I could build a scene with.  Because the white cardstock I was stampin on was only 3 x 3 this limited my choice of stamps, but I finally narrowed down my choice to Christmas Lodge or Snow Much Fun, and you guessed it, Snow Much Fun won out.  Let's see if I accomplished this sketch:
:
Isn't this fat little snowman simply irresistible? He's from the Snow Much Fun stamp set and I just couldn't resist having him peaking through the window into the Lodge.  The card base is Cherry Cobbler with a layer of Always Artichoke. I was looking for a wall panel effect with the artichoke layer and I think I achieved that by embossing it with the new Stripes Embossing Folder (123128 pg 218 IB&C) and distressing around the edges with Always Artichoke ink.  I also added a layer of Early Espresso for the window panes and embossed this piece with the Square Lattice Embossing Folder (119976 pg 218 IB&C).   
 
The snowman image was stamped on a 3 x 3 piece of Shimmery White cardstock with Early Espresso and Versa Mark inks and then heat embossed with Clear Embossing Powder. To build the scene I stamped a mask for the snowman on a piece of sticky note paper and then stamped the tree and the snowball overtop of the original snowman.  It worked!   The sketch was coloured with Baja Breeze, Always Artichoke, Pear Pizzazz, Cherry Cobbler, Pacific Point, and Crumb Cake makers.   The snow flakes are from the Serene Snowflakes set (115438 pg. 36 IB&C) and were stamped in Baja Breeze.   To give a little sparkle to the snow scene I used the new Dazzling Details irridescent glitter glue (124117 pg. 41 Holiday Mini) on the snowflakes, snowball and snowman.

Here's a closer look at my Snowman.  Once you've stamped your scene on the 3 x 3 inch piece of cardstock just cut it into 1" strips and then cut those strips into 1" x 1" blocks.  For the window pane effect start by lining up top row making sure each square is lined up and there's equal distance between the blocks.  I glued my blocks down with  Tombow glue to ensure they stayed put.  Once you've got the first row done it's just a case of doing each additional row and using the upper one as a spacing guide. 

The sentiment on my card is from the "Christmas Lodge" stamp set.  I stamped it in Cherry Cobler on a 3/4" by 3" strip of cardstock.  I used the Modern Label punch on each end to add some interest.  The sentiment is layered over top of a strip of the new Cherry Cobbler 3/8 Quilted Satin Ribbon (124105 pg 30 Holiday Mini) and a label punched out in cherry cobbler with the Decorative Label Punch.  The edges were distressed with Cherry Cobbler ink. 


Hope you enjoyed this post. 

Sunday, October 23, 2011

Stampin Queen's Sketch Challenge #9

Wow, Sunday again.  This week has gone by in a flash.  There's so much happening in the next few hours that I decided I better get this card posted before I ran out of time............ what's new.  Today's Sketch Challenge was created by guest designer Pam Staples, and consists of lots of layers and embellishments.  Here's her sketch:

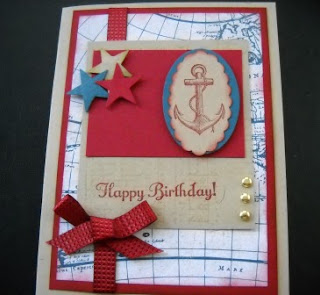
Since we're celebrating birthdays today I thought I would use this sketch for  my friends Jerry and Carol's birthday cards.  Jerry's birthday was actually yesterday and Carol's is on the 26th. 

We always buy scratch and win tickets for our friend's birthday cards, so I've incorporated a little holder for these tickets on the inside of the card.  Okay here is Jerry's card and I'll post Carol's later in the week after her big day!  Shhhhhhhhhh she turns 65.


Atlantic Hearts Sketch Challenge #572:

April has sure been living up to its reputation for rain showers but it's been really on the cold side which isn't normal for this t...